10 QR Code Design Rules for Flawless Scans

A gorgeous QR Code that will not scan does not drive clicks, leads, check-ins, signups, or sales. It just sits there looking clever while customers move on. Great QR Code design starts with one promise: Optimize the layout to make the scan effortless and prioritize scannability.
Real campaigns put that promise under pressure. Packaging curves, lighting changes, and phone cameras vary. People scan fast, at odd angles, with shaky hands. Use these rules as your pre-launch checklist for branded codes that look sharp and scan fast.
Note: The brands and examples discussed below were found during our online research for this article.
Key takeaways
- Following the ISO/IEC 18004 standard structure protects the finder patterns, timing patterns, and alignment patterns that scanners need to detect and decode your QR Code.
- A four-module quiet zone around every code prevents background elements from interfering with detection algorithms.
- Sizing modules correctly for viewing distance, with larger codes for posters and smaller for handheld items, ensures cameras can resolve individual squares.
- High-contrast dark-on-light color schemes and appropriate error correction levels (H for logos, M for standard use) maximize scan reliability across lighting conditions.
- Testing on multiple devices and under real-world conditions catches problems before your code reaches customers.
1. Follow the QR standard structure
QR Codes follow the ISO/IEC 18004 standard, and that structure gives scanners a reliable map. When you respect that map, a phone can find the code, orient it, read the grid, and send the user to the right destination in seconds.
Start with the three big squares in the corners. Designers often call them finder patterns or “eyes”, and scanners use them to locate the code and understand its angle. Timing patterns run between those corners, helping the scanner count rows and columns. Larger QR Codes also include alignment patterns, smaller squares that help scanners correct distortion on curved packaging, folded flyers, and angled signs.
Treat those elements as non-negotiable. Do not stretch them. Do not crop them. Do not turn them into brand icons. Keep creative touches in safe customization zones inside the matrix or around the call to action.
2. Keep a four-module quiet zone
Give every QR Code breathing room. The quiet zone means the clear margin that surrounds the matrix and separates it from nearby design elements. Keep at least four modules of uniform, light-colored space on all four sides.
That margin helps scanners understand where the code begins and ends. Without it, a headline, border, photo texture, or packaging pattern can blend into the matrix and confuse detection. The design might look polished to a human eye, while the scanner sees visual noise.
Watch for sneaky violations. Text that hugs the code too closely can eat into the quiet zone. A decorative border can touch the outer modules. A busy image can sit behind the margin. A sticker edge can crop the code. Build the quiet zone into the artwork from the start, then protect it through every resize and export.
3. Size modules for the viewing distance
A QR Code does not succeed because the overall square looks big enough. It succeeds because the camera can resolve each module, meaning it sees each tiny dark or light square in the grid, rather than a blurry cluster of pixels.
Use the expected scanning distance as your sizing guide. A practical rule of thumb says the scan distance should equal about 10 times the code’s shortest side. A 2 cm code suits close handheld scans. A 20 cm code suits a person standing a couple of meters away. Posters, banners, window clings, and trade show displays need more generous sizing than labels, business cards, table tents, and product inserts.
For printed materials, aim for module widths of around 0.4 to 0.5 mm for reliable smartphone scanning. Dense codes need larger modules because they contain more rows and columns within the same physical footprint. Our guide to minimum QR Code size helps teams connect the required minimum size to real-world scan behavior when printing QR Codes across packaging, signage, and event collateral.
4. Use high contrast dark-on-light colors
QR scanning software turns camera input into a dark-versus-light decision. Strong contrast helps the software make that decision quickly. Weak contrast forces it to guess.
Stick with dark colors for modules on a light background. Standard black and white works for a reason, but you still have room for brand color. Dark navy, deep green, and charcoal can scan well on white or cream. Aim for at least roughly 40% luminance contrast, then check the result under real lighting.
Avoid inverted codes, where light modules sit on a dark background. Some scanners handle them, but many struggle. Also skip subtle pairings like gray on light gray, pastel on pastel, or yellow on white. Glossy finishes, reflections, and screen glare can reduce contrast after launch, so start with more contrast than the mockup suggests.
5. Preserve finder, alignment, and timing patterns
The critical patterns function like the code’s navigation system. If a logo, texture, gradient, or playful shape damages that system, the scan experience falls apart.
Keep logos away from the three finder patterns in the corners. Keep decorative treatments away from alignment patterns. Keep timing patterns clean and consistent. Your campaign needs to perform well across older devices, rushed users, and messy environments, not just perfect lighting with a top-tier phone.
You can still brand the code. Customize modules in safe areas. Add a logo near the center when error correction and size support it. Use brand colors with enough contrast. Place the code inside a larger branded frame while keeping the quiet zone intact. Smart customization builds recognition without stealing the scanner’s landmarks.
6. Pick the right error-correction level
Error correction adds backup data to the QR Code. That backup helps the scanner reconstruct information when a logo covers part of the matrix, a corner picks up a scratch, or a print run introduces small flaws.
QR Codes offer four standard levels of correction. L recovers about 7% of the code. M recovers about 15%. Q recovers about 25%. H recovers about 30%. Marketers often lean toward M for simple, clean designs and H for logo-heavy or high-risk placements.
Higher error correction does not always mean easier scanning. It adds more modules, which makes the code denser. If you print a dense code too small, each module shrinks, and camera recognition suffers. Choose the level that fits the risk, then adjust physical size so the modules still scan cleanly.
7. Shorten data to reduce code complexity
More data creates more modules. More modules create a denser code. Denser code shrinks each module to the same print size, making scans harder in the real world.
That matters for URLs. A short, clean destination creates a simpler code than a long URL stuffed with parameters. A Dynamic QR Code helps even more because the printed code points to a compact redirect while your team can update the final destination URL later. If you read our guide to making short URLs with technical QR Code best practices, you’ll see that the big marketing lesson stays simple: Less encoded data gives your design more room to perform.
Avoid embedding huge text blocks, long vCards, or bloated campaign URLs when scan reliability matters. Use a dynamic code, manage the destination behind the scenes, and keep the visible matrix clean, compact, and resilient.
8. Customize shapes and logos without losing coverage
Custom QR Codes can look polished and on-brand. They can also cause trouble when the design treats modules as decorative confetti rather than data positions.
Scanners sample each module position and determine whether it is dark or light. Ultra-thin marks, tiny dots, oversized gaps, and mixed shape systems make that decision harder. If the scanner cannot classify enough modules, the code fails, or the scan takes too long.
Choose safer customization. Rounded squares, circles, and diamonds can work when they stay centered and keep enough dark coverage. Keep the shape, style, and size consistent across the matrix. Place a logo near the center, not over structural patterns, and keep it modest. Increase error correction when you add a logo, then increase the printed size if the added complexity tightens the module grid.
9. Place the code where people can easily scan
Even a technically perfect QR Code loses value when people cannot reach it comfortably. Placement shapes the scan experience as much as the matrix itself when using QR Codes.
Put the code where people naturally pause, look, and hold their phone steady. For product packaging, choose a flat area rather than a seam or crinkle zone. On posters, place the code at a comfortable height, ideally at eye level, and keep enough space around it. At events, avoid spots where crowds block access or lighting changes all day.
Add a short call to action (CTA) near the code. “Scan for details,” “Scan to claim,” or “Scan for the menu” tells people what they will get. That tiny bit of context can boost trust and action because users know the reward before they lift their phone.
10. Print or display with crisp resolution and suitable materials
Production can ruin a strong design. Blurry edges, low-resolution exports, reflective surfaces, and sloppy scaling all make modules harder to read.
Use high-quality vector formats such as PDF, SVG, or EPS for print whenever possible. Vectors keep module edges sharp at any size. If you must use raster artwork, export at a high-resolution for the final physical size and inspect the code at 100% scale.
Choose materials with scanning in mind. Matte finishes reduce glare. Glossy coatings can reflect overhead lights and wash out contrast. Curved, transparent, metallic, and textured surfaces add risk, so test those materials before a full run. For digital displays, avoid scaling that introduces blur or jagged edges.
Test on multiple devices and conditions
Testing turns good design into dependable performance. It also catches the small issues that mockups hide.
Build a simple QR Code testing routine before launch. Scan with both iPhone and Android devices. Test older phones, not just the newest device in the office. Try bright light, low light, glare, shadows, and the actual viewing distance. Scan from slight angles. Test with the final landing page live, fast, and mobile-friendly.
For high-stakes campaigns, scan physical proofs. A home printer proof cannot reveal every issue in a glossy label run, large billboards, or a backlit transit ad. Test the real artifact before customers do, and fix any problems while the campaign is still safely in your hands.
Turn flawless scans into actionable insights with QRCG
Reliable QR Code design does more than prevent frustration; it ensures successful QR Code scans that drive engagement. It protects campaign ROI. When people scan quickly, more of them reach your landing page, offer, product story, event flow, or checkout path.
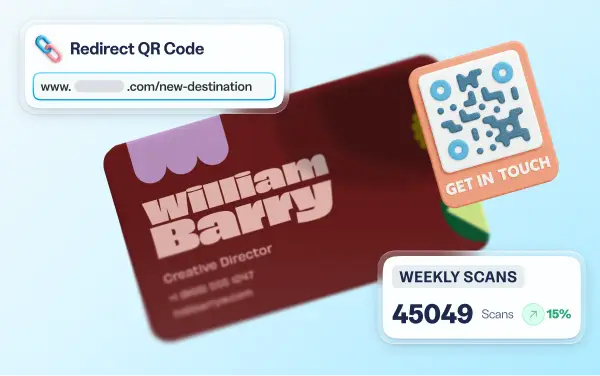
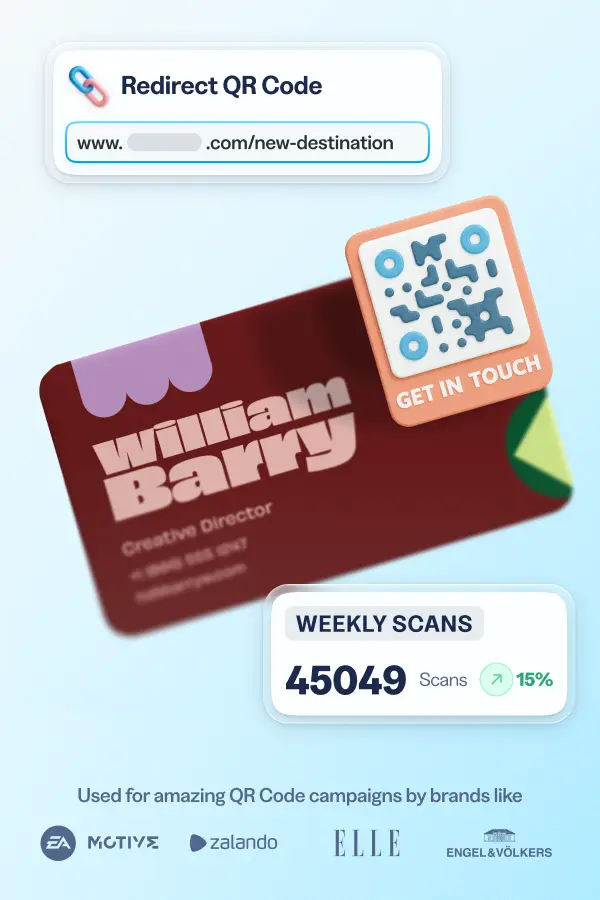
QRCG helps marketing teams create QR Codes and keep that scan journey strong from build to launch. Dynamic QR Codes keep encoded data to a minimum while your team retains the power to update destinations without reprinting. Customization tools help you create branded codes that comply with the structural rules scanners require. Real-time scan tracking shows where, when, and how people engage, so you can spot winners, fix weak placements, and make the next campaign sharper.
Your QR Code should look great, scan quickly, and deliver useful performance data to your team. When your next campaign needs that full package, sign up with QRCG and build a code that works as hard as the creative around it.
FAQs
What is the smallest size a QR Code can be and still work?
For handheld scanning, aim for modules at least about 0.5 mm wide, which often produces a QR Code around 2 cm × 2 cm for a simple URL. The true minimum depends on the code’s module count and the expected scanning distance.
Can I invert the colors of a QR Code?
Inverted QR Codes (light modules on a dark background) are not consistently supported and often fail to scan. For reliable results, use dark modules on a light background.
Does a background image or gradient interfere with scanning?
Yes, busy images and gradients reduce contrast and can confuse detection, especially around the edges. Place the QR Code on a solid, uniform, light area and preserve the full quiet zone.
QR Code Generator
Your all-in-one QR Code marketing platform
Now you can fully customize your QR Codes with your brand colors and company logo, get scan statistics, and even edit the content after print.